Zoom in the Classroom
User Guide Topics
Video Lessons
This document will provide you with information on using Zoom Workplace in the classroom. Zoom Workplace is one of several ways to provide your students with a synchronous virtual option of your lectures. If you are interested in using Zoom, please also visit the section on Zoom Rooms, an alternative solution to Zoom Workplace with many of the same benefits and some additional options to make the experience more seamless for you and your students.
To start, select the Web Conference Mode on the touchscreen in your room. Webconference mode should be used if you are using a videoconference tool such as Zoom Workplace or Microsoft Teams.
Zoom Workplace
In order to use Zoom Workplace, please start the class using the Crestron Touchscreen in Web Conference mode. Log into the instructor computer using your Bison Login.
If you have decided to use Zoom as your video conference platform of choice, follow these instructions. Please note that you should ideally schedule your Zoom connection prior to coming to your classroom so your students will have the meeting link accessible to them in advance. The option you select from the choices below depend on how you schedule your connection as well as your preference for each option.
Start your Zoom call using one of the following options:
- Open Zoom Workplace from the program list and click on the connection you have scheduled for this class
- Open a browser and navigate to ndsu.zoom.us. Sign into the web portal and then find your scheduled connection in your meetings list
- Open a browser and navigate to Blackboard. After signing in, find the link you have posted in your Blackboard class or open the Zoom LTI tool in Blackboard and start the connection from there.
When Zoom Workspace asks about the audio conference options, please select "Join with computer audio"

Once you are in your Zoom call, select the up arrow inside the microphone button (located in the bottom left of the Zoom window) and select "Test speaker and microphone"

Zoom will play audio out of the selected speaker. If you can hear the audio played back in the room, please select "Yes". Otherwise, select "No, try another speaker" until you can hear the audio.
Next, it is time to test your microphone, so please unmute your lapel microphone and start talking. If you can see the volume level move as you speak and hear your own voice played back over the speakers, select "Yes". Otherwise, select "No, try another microphone" until you can hear the audio.
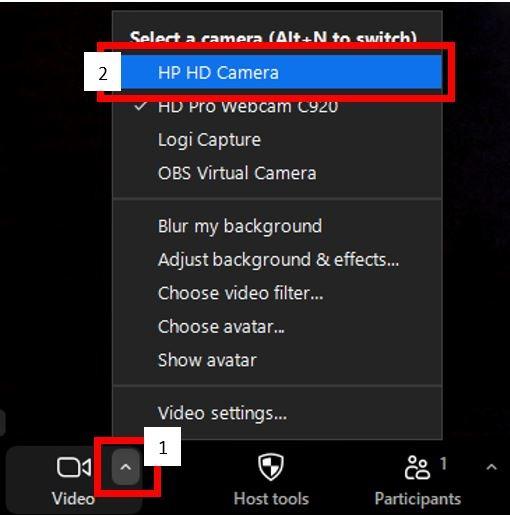
In case the camera is muted in Zoom (camera icon is crossed out), please click the camera icon to start your camera feed. If you do not see the room camera displaying in your Zoom window (in that case you will most likely see a blue screen), check the camera selection by clicking on the up arrow inside the camera icon and selecting the option labeled "Camera".
In order to share content to your meeting, press the “Share” button in the menu on the bottom of the Zoom window. Then select “Screen” under the "Entire screen" heading and then select “Share”. This allows you to present any application on the computer. Remember to check the "Share sound" checkbox if you are planning to share a video or audio file with your class

If you would like to share one of the other available sources, such as the document camera, first select that source on the touchscreen, then select “Share” in Zoom. At the top of the next window select the “Advanced” tab and then select “Second Camera” (1) then “Share” (2)


If you are seeing a blue screen after sharing your content in this way, please click on the “Switch Camera” button in the top-left corner of the screen until the correct source is appearing in the meeting


Once you are done with the source you are sharing, whether it is the computer or a different source, click on “Stop Share”. This will go back to the classroom camera being the main focus of the meeting.

When you are done, select “End” then “End Meeting for All”. Then you may close out of the computer as needed.


