Mobile Source
User Guide Topics
Video Lesson
Mobile Source
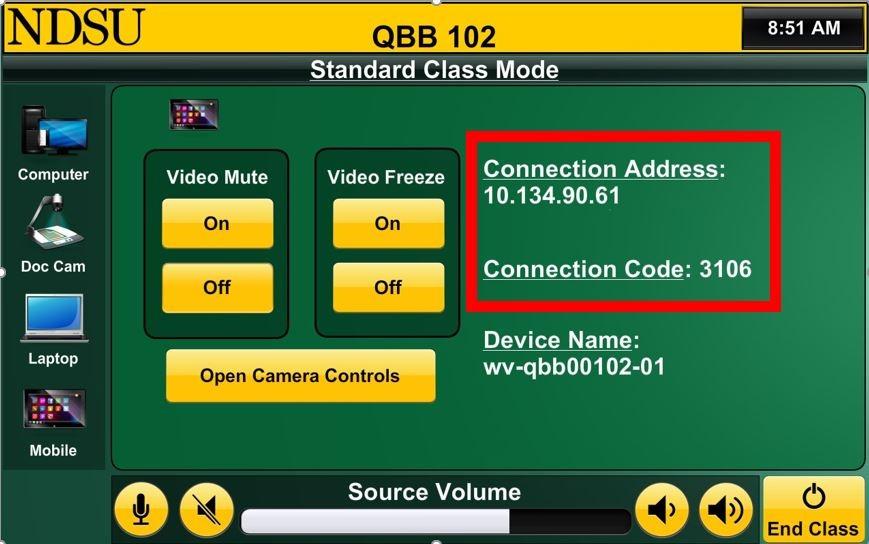
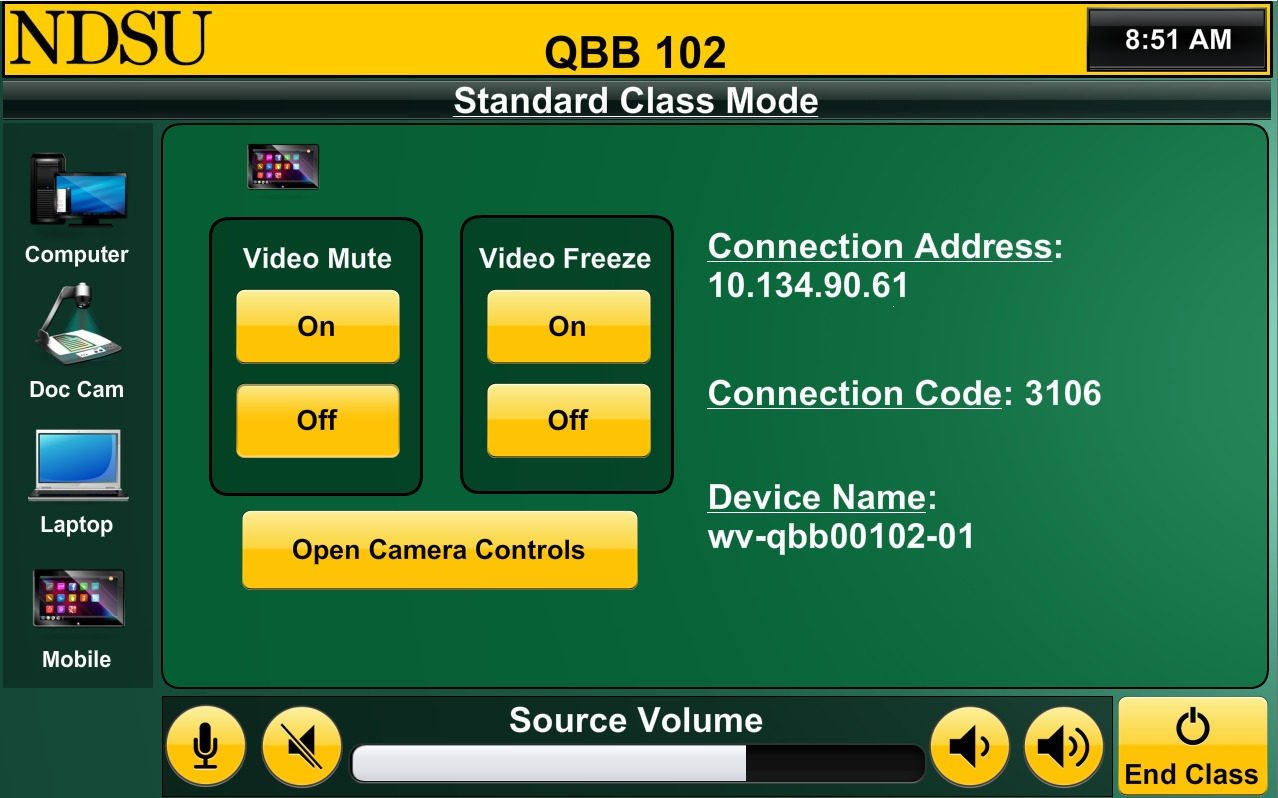
This document will help you better understand how to utilize the mobile source option on the touchscreen. To begin, make sure that class has started and that the “Mobile” option has been selected on the touchscreen in the left-hand menu at the bottom.
Selecting this option will once again have the video mute and video freeze options and will also have text on the right side of the screen. This is the necessary information to connect your device to the system to present. The first time using the Mobile source option from a laptop computer (Mac or Windows), we suggest downloading the needed software beforehand using the information provided on this page.
Connecting a Laptop (Window or Mac)
Use the Crestron Touch Screen to start class in any of the three class modes. Once class is started, select Mobile as the source. On the Crestron Touch Screen, and presented on the displays, you will see a connection address displayed. The address will be a series of four numbers that will be in the format: 10.134.00.00. Take note of that address, you will need it later. Now open a browser and navigate to the address you just noted. You will be presented with a screen prompting you to download the AirMedia software. Select the appropriate option (Client for Mac or Client for Windows) for your device. In Windows, follow the prompts to install the software. On a Mac, open a Finder window and navigate to your Applications folder. Drag and drop the Crestron AirMedia application into your Applications folder.

Now you are ready to mirror your laptop using the following steps.
| Windows | Mac |
| Open the Crestron AirMedia Application that you previously installed and enter the connection address from the touchscreen in your classroom into the field for hostname or address. | |
|
Once you have entered the address, hit enter. Now enter the code displayed on the touchscreen and click "Connect". |
Open Control Center from the menu bar. Select Screen Mirroring. Choose the address that was collected earlier. You will be prompted to enter the AirPlay password. Enter the Connection Code from the touchscreen. Deselect “Remember Password”. The connection code changes every time the system is used, so remembering it will not be useful and may cause problems. |
|
|
|
|
|
|
|
|
|


Here is a complete install and connection guide for your Mac laptop: Mac User Guide
Connecting an iOS Device
To connect an Apple device, go into the control center of your device (by swiping downward from the upper-right hand corner), and select the icon with two rectangles going over each other.

This will open the screen mirroring menu. To make the connection, find and select the name of the room as displayed on the touchscreen under "Device Name". After making the correct selection, it will prompt for a passcode. This can also be found on the touchscreen. After entering the passcode, the connection will be made, and you can present video/audio from your mobile device. When you are done, go back into the control center of your device, open the screen mirroring menu, and select “Stop Mirroring.”

Connecting an Android Device
To connect with an Android device, you will need to install the application called “Crestron AirMedia” from the Google Play store. After doing so, open the application and enter the URL or Connection Address displayed on the touchscreen. It will ask for the passcode after you select the correct device. After completing these steps, tap the button that says “Present with AirMedia.” When you are done, go back into the app and select the “Stop Sharing” button.